Focus
Controller:
Channels1-24
On Lighting Controller Should Now Control Beam Table.
Check That The MASTER Fader Is Up.
Check SUB-MASTER Faders ( They Should Be Opposite In Pos.
)
Check Bump Button Master Is On CHANNEL Mode.
Channel LED's Should Blink/Fade Accordingly ( 1 - 48 Top
Row Of Lights ).
Note:
If
Console Is Responding Strange (See Trouble Shooting
Section T-2 ).
Caution - use
of controls or adjustments or performance of procedures
other than those specified herein may result in hazardous
radiation exposure.
Beam
Alignment:
1) Carefully Remove
End Panel ( 2' x 1' ) On Beam Table.
2) Align Laser So
That It Hits The First 1"x1" Mirror Mount ( MM1
).
This Should Direct The Beam 90 Deg. Towards The 2nd MM1
3) Turn Shutter UP At
Console ( Ch. 18 Or 24 ). If Shutter Is Not Present Check
Workbox For Small Cardboard Box (6"x 6"x
8"). Inside You Will Find A 3-Filter Color Box With
A Shutter. Plug It Into The DB-9 Connector Located Near
Sub-Table ( 6"x18" Inside Near Laser Nose Area,
Hanging Loose ). Mount Or Place Color Box So That It
Blocks The Beam When Shutter Is Closed, And Passes Beam
When Open.
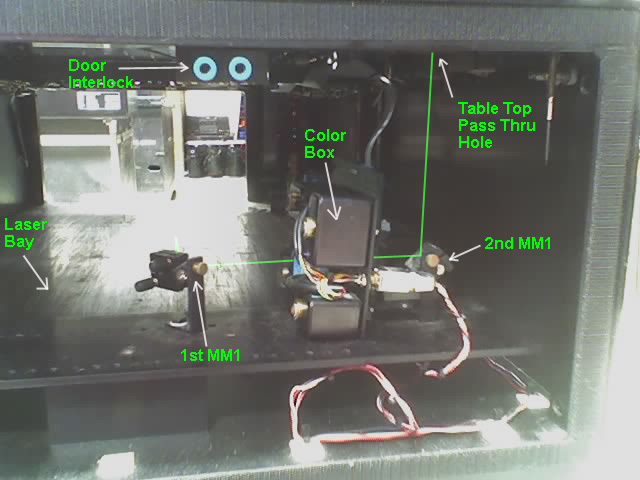
4) Bypass Shutter
With Beam & Hit The 2nd MM1 ( = Up Direction Through
1/2" Hole To Top Of Table)
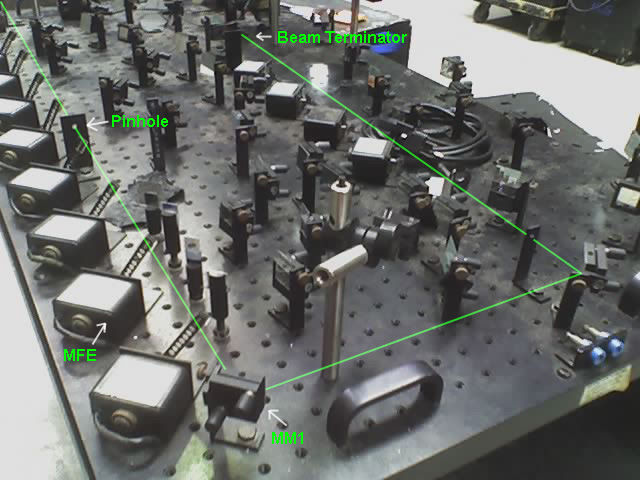
5) At This Point All
Other MM1's Should Be Fairly Close.
If Not Adjust The First & Second MM1, So That The
Beam
Travels Down The Table Top Missing Pin Hole Brackets
& Mirror Arms. ( You Can't Hurt Anything, Just Be
Patient )
6) Beam Should
Terminate In The Beam Stop ( 1" Long Tube ).
Primary Alignment: ( On Table )
1) Turn Up Channel #
1 On Lighting Controller. ( See Safety Check Chapter Item
#3).
2) Position # 1
Should Be A Two Beam Launcher.
3) Using " T
" Wrench ( Found In Tool Box ), Loosen Optic's
1/4-20 Hex Nut & Carefully PAN MM1 To Close Proximity
Of Target & Tighten Nut.
4) Loosen Brass Tilt
Screw & Tilt To Close Proximity Of Target. This Will
Be Much Easier If You Hold The Back Plate Behind The
Mirror or Optic And Rock It Downward In A Swinging
Motion. It may Seem Very Tight At First, But It Will
Break Loose Quickly. Take Care Not To Put Pressure On The
Front Optic Plate. Also Be Aware That The Beam Will Be
Unpredictable In The Swing, Keep Your Head Off Axis Or
The Beam Travel.
5) Tighen Brass Screw
By Undercompensating Position, Hold Screw And Rock Up
Into Tightness And Position.
6) Now Use Fine
Adjust Screws On Back Side Of MM1 To Hit Target. These
X/Y Screws Should Give You A 15 Deg. Swing. If They Max
Out, Restore Them To Center Pos. & Re-Focus Using
Coarse Adjust 1/4-20 or Brass Screw.
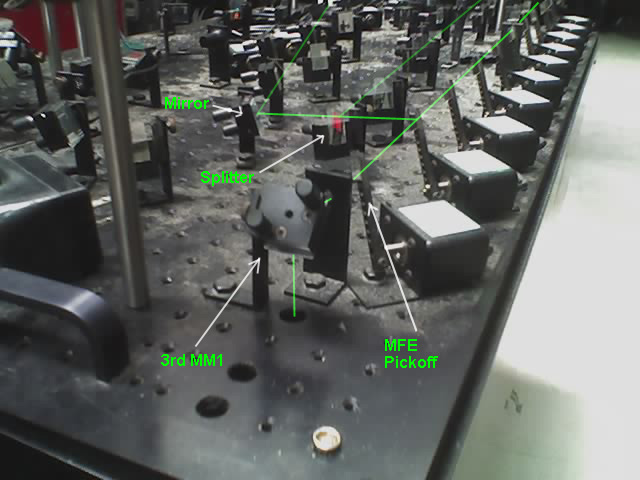
Note: If Laser Is
Missing The MM1's. You Can Manually Rotate The MFE (Pick
Off Arm Motor) Till Corrected. If Mirror Arms ON MFE Are
Missing Or Eccentric Of The Beam ( See Trouble Shooting
Section T-1 ).
Secondary Alignment: ( Target Mirrors
& Remote Effects )
1) Carefully Pan
& Tilt Instrument To Close Proximity
& Tighten Both Mount & Pan Screw On "G"
Clamp.
2) Tighten All
Adjustments On Yoke Of Instrument
3) On Bounce Mirrors,
Using X/Y Fine Adjustment Screws Hit Your Target, Or
Termination Point (Wall/Tree/Sky/Etc.).
Note: Pre-Focus - Slightly Angle
All Mirrors And Effects Up For Safety. Also Orient All
"U" Yokes Horizontal Initially.
Note: Focusing Mirrors - Rotate And Tilt
All Devices Without Looking At Them. Always Keep Both
Eyes On the Laser "Dot", Taking Care Not To
Allow Dot To Go Into The Floor Or Near People.
Note: Flagging - Flagging The Beam Is A
Wonderful Technique When Working with Conventional
Lighting Fixtures. It Allows You To Cast A Shadow Onto
The Floor To See Your Exact Field Of Focus And Where It
Is Spilling. Unfortunately, This Technique Does Not Work
For Focusing Laser "Beams". It Does However
Work On Scatter Effects Such As Lumias Or Diffraction
Gratings. You Can Always Spot the Lighting Guys On The
Laser Job Waving Their Hands In Front Of A Mirror Looking
For The Beam. The Best Way To Locate A Beam Is To Gently
Tap The Mirror With Your Finger, Which Will Set Up An
Oscillation And Cause The Beam To Wiggle 1-2 Degrees Out
In The House Which Usually Equates To 2-5 Feet Of
Excursion. If That Still Is Not Enough, Tilt The Mirror
Upwards.
|