Addendum
ATTENTION - ATTENTION - ATTENTION : Laser Gear Is NOT Lighting, Sound,
Or Video Gear. Please Take Extra Care With ALL Cases. NEVER Bump Them Up Or
Down The Ramp Or Doorways. Stop Get Help. Regardless Of
Contents. Never Run Them Up The Ramp, Stop And Get
Assistance. The "Silver Rule" Is Slow and
Overly Cautious.
NEATNESS:
Cables And Hoses Should Be Routed In Such A Way To Not
Only Be Safe For Public And Backstage Access, But Look
Intentional Or Clean. This Is Secondary To Functionality.
Time Permitting, It Is Expected For All Indoor Shows. It
Also Offers Ease In Troubleshooting.
Trouble Shooting
T-1
ARM ALIGNMENT PROCEDURE
If Mirror Arms Are Missing Or Eccentric To Beam Remove
Front Cover Plate on Beam table (4' x 1'), & Retrieve
Small Slotted Screwdriver From Hole # 1 On Top Of Table (
Far House Left Down Stage Corner ).
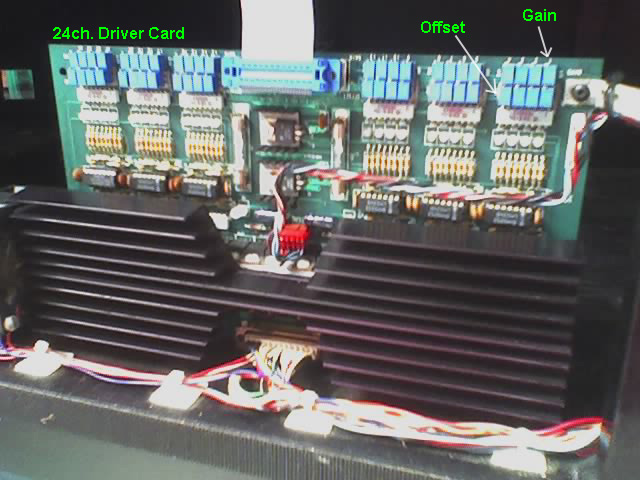
Inside You Will See A 24 Ch. Driver Card,
Channel Numbers Are Printed On The Top Row Above Blue
Potentiometer ( Pots ). Each Channel Has Two Pots., Top
Is GAIN & Bottom Is OFFSET. With The Channel Down
Adjust The Offset Pot So That Arm Is Out Of The Beam
Path, 3/16" +/-. Next Bring That Same Channel Up To
Full, Now Adjust The GAIN Pot So That The Arm Is In The
Center Of The Beam. Turn That Same Channel Back Down
& Check The OFFSET Again. (Make Sure That The Ch. LED
(light) On The Card Is Not RED, If So Back Off OFFSET Pot
Until Red Is Gone. You Will Then Need To Adjust Arm With
Allen Set & Restart With Procedure Agian. LED Should
Be Off When Channel Is Off & Green When Faded Up.
T-2
CONSOLE IS NOT RESPONDING TO CHANNEL ASSIGNMENTS
Press SETUP On Console Display Should Read "BEAM
TABLE T15", If Not Hold MODIFY And Rotate Wheel, You
Will Have 3 Choices. Be Aware Sometimes Channel 1 Is Soft
Patched to Channel 14, That Is Fine, Don't Use Ch.1 Use
Ch.14.
T-3
LASER IS ON AND DRAWING CURRENT BUT HAS LOW OR NO OUTPUT
Check To Make Sure That Cavity Shutter On Top Of The
Laser Head Is Not In The Way Of The Beam.
If No Beam Is Present Make Sure Current Is
Being Used ( 50 Amp Scale On Power Supply Meter ), If So
Set Output At 15 Amps And Proceed.
If No Beam, Try Gently Wiggling Or Seating The Front
& Rear Mirror Mounts On Laser Head.
If Beam Is Weak, Adjust X & Y Adjustment
Screws On Back Of Laser Head. Located Near Gray Umbilical
( Upper Right Hole & Lower Left Hole ). Make Sure You
Are Using The 1 Or 5 Watt Scale On Power Supply Meter.
Turn X Then Y Screw To Achieve Greatest Output, Go Back
And Do X & Y Again.
Appendix
A-1
LASER WARM UP, OPERATION & COOL DOWN PROCEDURE
Start Laser With Current @ 2 On Knob, Field Knob @ 0. Set
METER Switch To The 50 AMP Setting, Reading The Top Scale
Adjust The Current Knob So That Needle Is @ 15 AMP. 15
AMP Is Considered "IDLE" Power (20AMP for Large
Frame Lasers ex: 20watt). Use This Spot For Warming Up
The Laser & Cooling It Down. Do All Your Focusing @
IDLE, Also Between Rehearsals & Performances. Warm
Laser @ IDLE For Minimum Of 5 Min.
Regarding Full Power, Turn Current Up In 10
AMP Increments. Waiting 10 Sec. Between Increments, Goal
Is 32-35 AMP. Next, Set METER Switch To 1 or 5 WATT
Scale, And Note Where Needle Is. Now Turn Up FIELD Knob
Slowly To 80%, You Should See A Increase In Output Power.
Cool Down Is All The Above In Reverse Order: FIELD To 0,
Current To 15 AMP In 10 AMP Increments & IDLE Laser
For 2-5 Min. Next Switch Breaker Off & Allow Water To
Continue To Run For 2 - 5 Min.Or Cool To The Touch @
Drain.
A-2
WATER BLOW OUT PROCEDURE
After Cool Down Procedure, Shut Off Pump And Then Main
Water Head. Unscrew Hose From Nozzle at Head, And Connect
To Air Compressor. Before Starting Compressor Make Sure
That It Is In The Start Position ie: Turned Back All The
Way To The Left, You Will See The Word START on The Knob
Shaft. Start Compressor Switch Near AC Cord. Slowly Open
Air Flow ( To The Right ). Watch PSI Gauge On Pump
Assembly, Do Not Exceed 40 PSI. Look For Output At Drain,
If All Is Fine Let System Drain Until It Starts Spurting
Or Coughing ( 5 - 10 Min, Varies Due To Hose Length ). At
This Point Turn Up Air Pressure To 60 PSI On Compressor
Knob Shaft. However It Will Still Register 30 PSI +/-, On
Pump Gauge. Water Will Continue To Cough, 2-3 Min. Later
Shut OFF Compressor.
Packing
List 3/95
CASES:
_ 5 Watt Head
_ Power Supply
_ Beam Table
_ 8" Mirrors
_ 4" Mirrors
_ Effects
_ Board
_ Water
_ Workbox
_ Computer
WATER
DISTRIBUTION:
_ Hose Assortment
_ Filter
_ Pump
_ PSI/Regulator Set
_ Pluming Kit
_ Air Compressor
_ 18" Fan
WORK
BOX:
_ Tool Box
_ Optic "T" Wrench
_ Mikita
_ Sm. Slotted Screwdriver
_ Little Lite Desk Lamp
_ Console Power Supply
_ Control Cable 25DB
_ Remote Backup
_ Heater/Dish/Bottles
_ Cone Generator
_ Gaff Tape
_ Safety Tape
_ Safety Interlock Remote
_ Safety Pylons 4
_ Safety Mats 4
_ Lot Of Safety Cable
_ Lot Of Cable Ties
_ XLR Cables 6
_ Hazer & Fluid
_ #8 Feeder Runs (2) 100'
_ Tails
_ Lot Of Tie Line
_ Power Strips 4
_ Orange A.C. 6
_ 7' x 12' Black w/2 Pony Clamps
_ KLS Binder / Safety Sheet
_ CD Collection
_ Synthesizer w/ 1/4" Cable
COMPUTER:
_ Wyse Terminal
_ Keyboard
_ Stingray
_ S-Ray Kit
_ Ribbon Cable
LOOSE:
_ Console
_ 6' Ladder
_ 10' Ladder
_ Fish Pole
_ Floor Base Crate
_ Apple Boxes "Full"
_ Radio Set
_ Power Amplifier
OPTIONAL:
_ Masts
_ Mast Plates
_ Scaffold w/"X" Braces (Large / Small )
_ Plastic Tarpaulin (Outdoor)
_ Backup Laser ( HeNe / Air Cooled / 5w )
_ Graphics Table
_ #2 Feeder Cable 185'
_ Rigging Box
|